
One of the most critical steps in making a WordPress site is choosing the right page builder.
Why? Because a page builder can help you create stunning websites very easily.
One of the best premium page builders that we recommend is the Divi page builder.
In this article, we’ll show you how to install the Divi Builder plugin on your WordPress website through 3 different methods.
Let’s get started!
📝 Important:
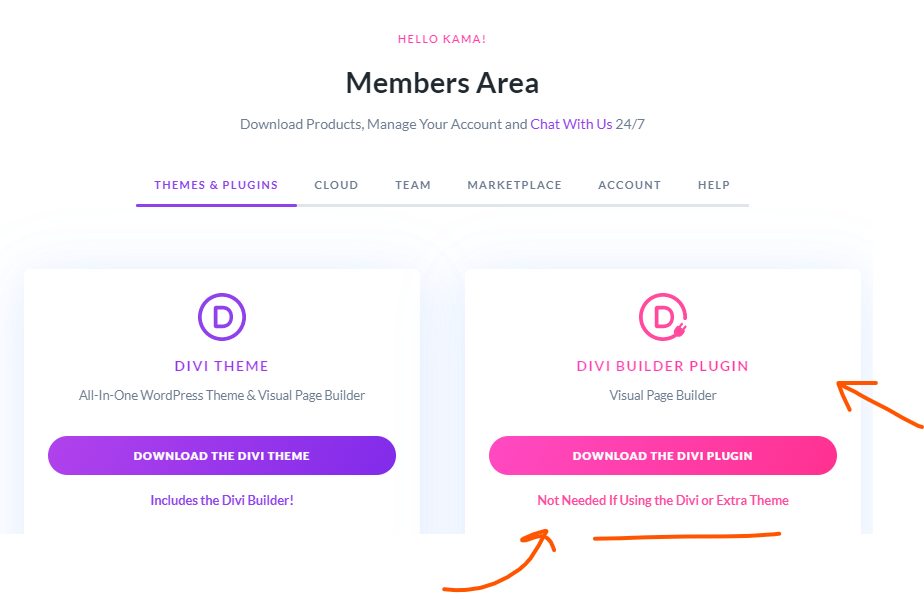
The Divi Theme and Divi Builder are not the same. These are two different products.
When you install the Divi Theme, you get the Divi Builder bundled with it.
When you add Divi Builder as a standalone plugin to your website, you can use it with any WordPress theme you want. It does not come bundled with Divi Theme.
Learn more about the difference between Divi Theme and Divi Builder here.
🛠️ Check the complete list of WordPress Page Builders here ➡️
Method 1: How to Install the Divi Builder on WordPress With the Upload Plugin Feature
In this section, we will show you the easiest method on how to install the Divi Builder in WordPress. We will make use of the “Upload Plugin” feature of WordPress.
Step 1: From your Elegant Themes membership area, download the Divi Builder plugin file. It will be in ZIP format.
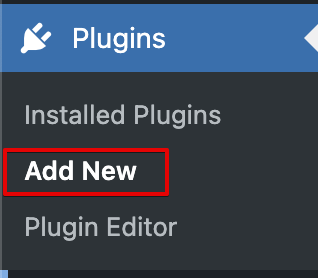
Step 2: From your WordPress dashboard, go to Plugins > Add New.
Step 3: Select the Upload Plugin option and use the Divi Builder ZIP file that you downloaded from the Elegant Themes website.
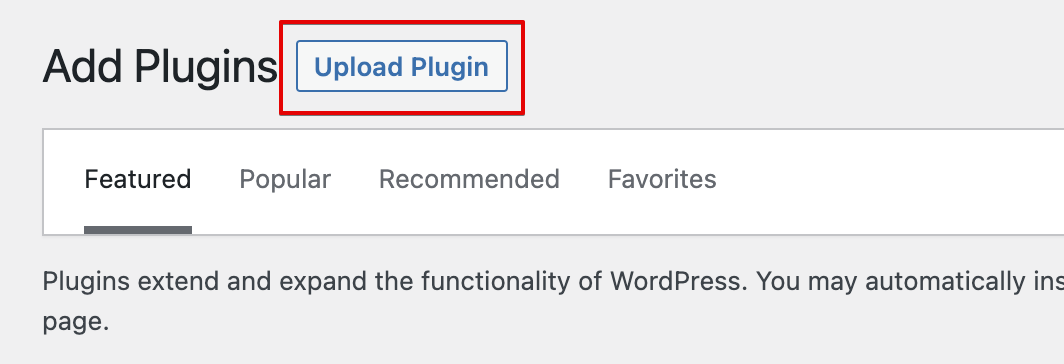
Step 4: Click on Install Now to start the installation.
Step 5: Next, you have to click on Activate Plugin.
That’s it! The Divi Builder plugin has been installed.
If you want to upload this plugin manually through an FTP client, keep reading the next section of this post.
⚡ Check also: Divi Review
Method 2: How to install the Divi Builder on WordPress With FTP
Now, we will teach you how to install the Divi Builder plugin using FTP or File Transfer Protocol.
This method is a little bit more technical, but don’t worry! We will guide you through the whole process.
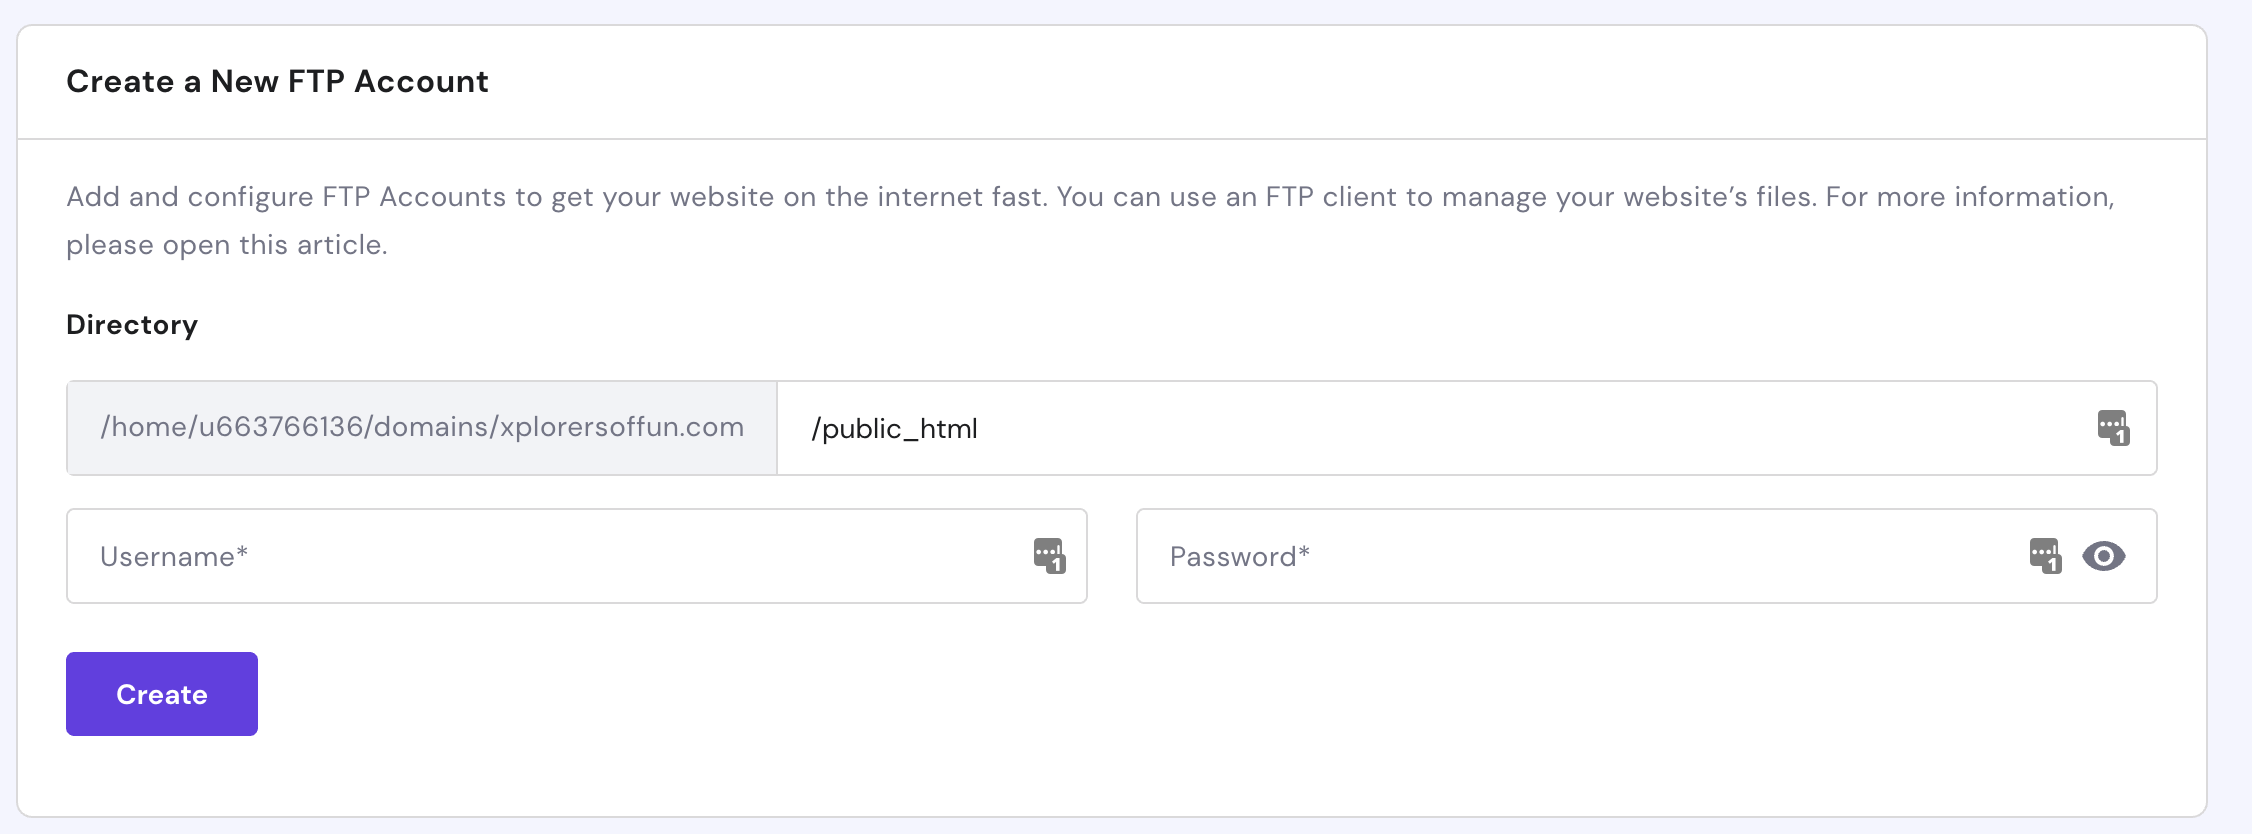
1. Create an Account
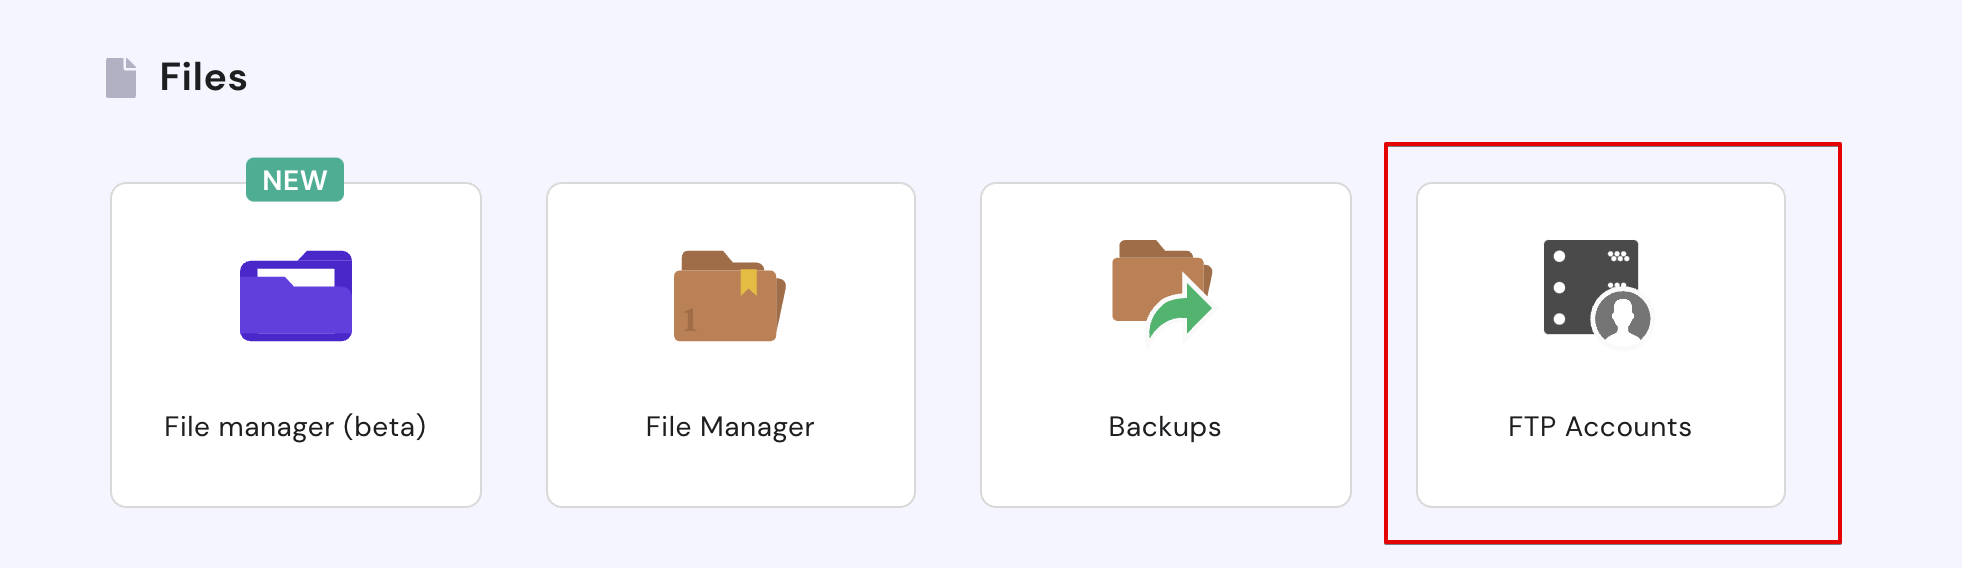
Step 1: Create an FTP Account by going to FTP Accounts from your cPanel.
📝 Note
Here you may see a different interface than us. However, the process is almost the same in every cPanel version.
Step 2: Enter your username and password and then click on the Create button.
📝 Note
Usually cPanel will fill the Directory field automatically, however, we highly recommend you to add manually the directory that you’d like to access.
Once the account is created, it will appear in the account list.
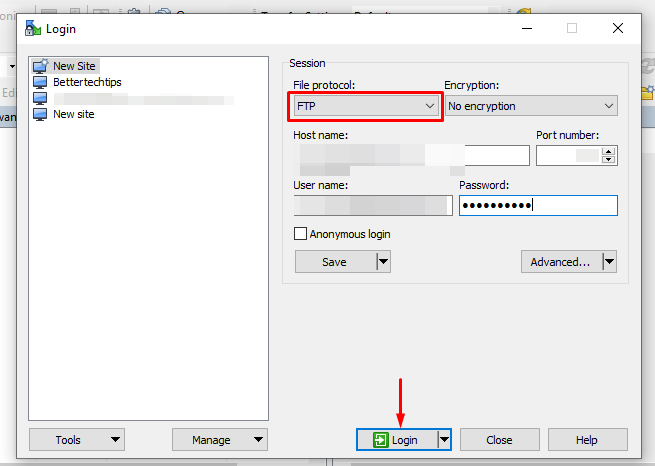
Step 3: The next step would be to download an FTP client on your computer. You can either pay for one or choose from the tons of free options.
Now that you’ve set up your FTP account, let’s look at how you can use it to install the Divi Builder.
2. Upload the Plugin’s Files
Step 1: With the help of your FTP application, login with your details.
Step 2: Upload the Divi Builder installation files into the /plugins/ folder of your website.
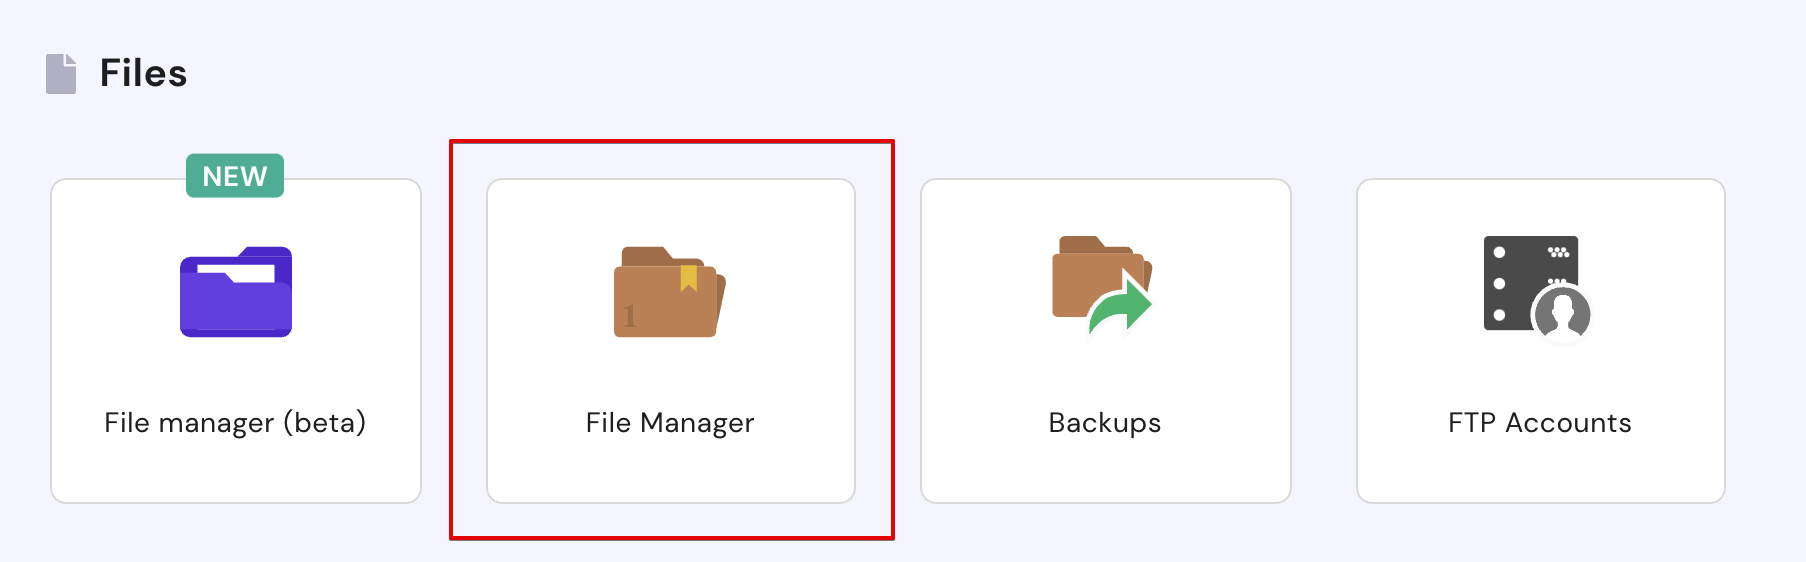
Step 3: After the file has been uploaded successfully, use the File Manager tool from your web hosting provider’s dashboard.
Step 4: Right-click on the Divi Builder file that you just uploaded in the /plugins/ folder and extract it.
📝 Note
Also, you can just extract the zip file on your computer and then upload the extracted file to your /plugins/ folder through your FTP client.
Step 5: Go to Plugins > Installed Plugins and activate the Divi Builder.
⚡ Check also: Divi Builder vs Divi Theme
Method 3: How to Install the Divi Builder on WordPress Plugin Using the Divi Theme
Apart from using Divi Builder as a standalone product, you can also use it with the Divi Theme.
As we said before, by installing the Divi Theme, you’ll automatically get access to the Builder plugin as it is integrated with the theme.
In this section, we will show you how to install the Divi Builder using the Divi Theme.
The steps to install the Divi Theme are as follows:
Step 1: Go to your Elegant Themes membership area and download the Divi Theme ZIP file.
Step 2: Go to Appearance > Themes in your WordPress dashboard.

Step 3: On the next screen, click on the Add New button. Then, click on the Upload Theme button.
Step 4: Upload the ZIP file from your computer and then activate the theme to use it on your website.
That’s it! The Divi theme has been successfully installed!

Free Divi Test Drive
Explore the surprising power of Divi Visual Builder
Final Words
Installing a plugin on WordPress can be quite confusing for beginners but now you know how to install the Divi Builder on your site with three different techniques.
🎨 Check the ultimate Divi review here ➡️
🔔 Check Also:
This is so helpful. The screenshots are huge. Thank you for making this clear.