Ever wondered how companies create their commercial websites to support their business?
We’ve got you covered! In this article, we will have an in-depth discussion on how to create a commercial website and why it’s essential for businesses to have one in the first place.
What is a Commercial Website?
As you may already know, there are various types of websites out there.
However, you can generally divide them into two big groups based on their original intention – personal website (for example a portfolio website) and commercial website.
The latter is what we’re going to uncover here.
Commercial websites are managed by a business with organizational motives.
Function-wise, it’s main purpose is advertising and increasing visitors’ product knowledge.
As every commercial website’s goal is to increase sales of a particular business, its content and design must reflect the brand’s image.
Apple’s main website belongs to such a group.
As a commercial site, the webpage is meant to educate visitors regarding Apple’s brand and products as well as facilitate the transaction process.
The color scheme also revolves around Apple’s logo, clearly indicating that it represents the brand.

Unlike personal websites, commercial websites leave little room for individual personalization.
Instead of leaving it to a personal choice, the brand’s tone of voice and appearance become the most significant influence of the web design and content.
What to Consider When Creating a Commercial Website?
Due to its close relation to a business, a commercial website involves more than just personal considerations during the designing process.
On top of that, the site needs to have all the required elements to ensure its original purpose – to support the marketing and sales side of a business.
To make sure your site serves its purpose, here are a couple of aspects that you need to consider when creating a commercial website.

Start WordPress Blog at only $2.95/month
Limited-time deal from BlueHost
Ease of Use
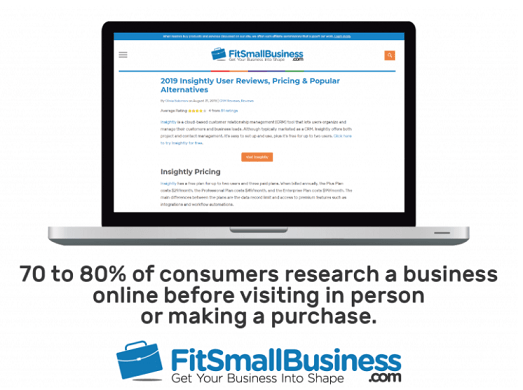
According to FitSmallBusiness, up to 80% of people make their purchase decision based on the company’s online profile. One of the easiest ways to access the information is through the company website.

As such, you need to make sure that visitors can navigate around your site easily. Having unclear navigation will cause people to bounce off quickly, and that will do your SEO and conversion rate no good.
Ease of use also means having great functionality. No one wants to find a broken link or run into a malfunction on any website.
Not only does a poorly built website fail to deliver what it promises, but it will also leave a bad mark on the brand the site represents.
Worst case scenario? It will make people think that you don’t take your business seriously.
Aside from having properly functioning features, it’s also worth considering whether or not they serve a valid purpose.
There’s no point in including fancy, complicated features just for the sake of appearance if they don’t contribute any value to your site (especially if your site contains some sort of web application functionality which is a quite complex thing on its own).
A good rule of thumb is to make everything count.
The bottom line is that you need to plan carefully on what your site wants to deliver.
Remember, there’s nothing wrong with having a simple and minimalistic website as long as it functions well.
Appearance
Aside from ensuring the proper functionality of the website, you also need to pay attention to its appearance.
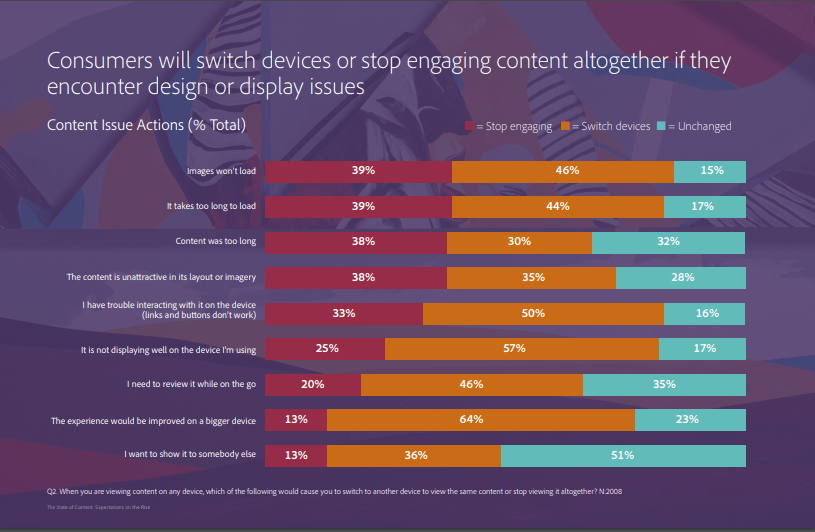
There were numerous tests concluding that somewhere around 38% of people choose not to engage a website that doesn’t look appealing.

You can enhance your site’s appearance by incorporating a well-designed layout and enticing visuals to support your site’s content.
Choosing a good color scheme is also important as it can help make the first impression and increase your brand awareness.
Despite all that, a good design doesn’t always mean a bombastic, color-rich look. Keep in mind that aesthetics have a close relation to the website’s usability.
At the end of the day, a good design shouldn’t obstruct the site’s navigation or distract visitors from its content.
Security
All types of websites are bound to have sensitive information that isn’t meant for public consumption. This is particularly true in commercial websites’ case.
Not only do they store company-sensitive information, but commercial websites also tend to collect and manage visitors’ personal data.
Unfortunately, the number of data breaches keeps increasing every year. Ransomware, data theft, phishing – there are tons of security breaches that can compromise your business and other people’s privacy. And they could happen to any website, including yours.
For this purpose, ensuring a secure web browsing experience must be your top priority.
How to Create a Commercial Website in Four Steps
Creating a commercial website can be challenging for users who have little to no experience with the website building process.
If you have no clue how to get started, take a look at the steps below as we will guide you through the steps.
Step 1 – Buy a Domain Name
You read that right – you should buy a domain name before even thinking about creating a website. Why? Because that’s the first part of your site that visitors will see.
Your domain name has the same function as your home address and that is how visitors will use your domain name to access the site.
The right domain name has to represent the site or, in this case, your business properly.
Commercial websites usually adopt their brand name as a domain name.
If you want to find other alternatives you can use one of these domain name generators for more name ideas.
Once you’ve found the perfect domain name, you can register it at a domain registrar.
Some popular domain registrars are Namecheap and GoDaddy.
The price will vary between domain registrars, but it will mostly depend on different factors such as “business-value” of words in your domain name, your top-level domain (TLD) and others.
The cost usually covers for one to two-year exclusivity, so make sure to renew it every year to prevent other sites from using your domain name.
Step 2 – Choose a Web Hosting Provider
To make your site accessible to everyone, you need to host your site on a web server.
Buying a web hosting plan from a web hosting provider will do you just fine as you won’t have to deal with the technicality behind it.
There are plenty of web hosting providers out there, so make sure you spend some picking the one that appeals to you the most (our recommendation is WPX).
Depending on the hosting provider, there are various types of hosting services to choose from.
If you’re working on a tight budget, you can go with shared web hosting as the most affordable option. If your site cannot afford any downtime, you ought to use cloud-based web hosting that has the highest level of reliability.
Bottom line, choose the one based on your needs.
Step 3 – Set Up a Website
Now that you have a domain name and hosting, you can start building your site.
Instead of creating it from scratch, you can use a website builder or CMS to save some time and make the whole process easier in the first place.
Most of these platforms are beginner-friendly, so you can still create a website yourself without relying on professional developers.
One of the most popular CMS worth considering is WordPress. It’s free, highly scalable, and extremely flexible in terms of integration and customization.
Most web hosting providers include a WordPress installer in their control panel, so you can immediately install it right after buying a hosting service.
WordPress may have a steep learning curve regarding its customization and navigation, but don’t let this deter you from using it.
The platform has a ton of tutorials and forums dedicated to helping new users understand how it works.
Moreover, WYSIWYG editors for WordPress can take the WordPress experience to the whole new level where you actually see what you are creating in real time.
There are also lots of different plugins available for WordPress that help to extend further the capabilities of this amazing platform (for commercial websites WooCommerce and related plugins, especially WooCommerce page builders might work really well).
Check out this step by step tutorial to see how easy it is to create a website using WordPress.
Step 4 – Create Content
After taking care of the technicalities, it’s time to move your content to the site.
First things first, you need to create a favicon. This icon is important as it will represent your site on various operating systems. You can either use your brand logo or create one from scratch using a favicon generator.
Next, you need to create business-centered pages to showcase your products and company profile.
Clustering content into several pages based on their purpose will help visitors navigate around the site much easier.
The cluster also allows you to optimize each page’s content with relevant visual media and features.
Once everything is set, you can start adding your business information to the site.
Be mindful to update your site content regularly to avoid confusing visitors with outdated information.
Also, avoid making grammar and spelling mistakes as poor content can result in a high bounce rate.
That’s a Wrap!
The perks of owning a commercial website are too great to ignore. Aside from supporting the marketing and sales side of a business, this website type can also increase brand awareness and build trust with customers.
Here are the steps you need to take to build a commercial website:
- Buy a domain name that would represent your brand
- Choose a bona fide web hosting provider
- Set up your website with the help of a website builder or CMS
- Create and publish business-related content.
If your company hasn’t had a commercial website yet, now is the perfect moment to fix it. Try making one and see how beneficial it is for your business in the long run. See you at the top!


Well explained